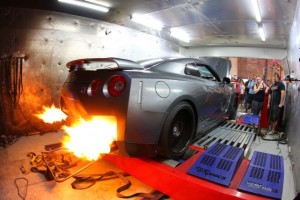
i haven’t made a new post in a long time. so here is an addition to the site, user djamps developed an open source tuning tool, you upload the log file filter some key data and perfect your maf table.
Survival guide for the modern computing world
by Chris

i haven’t made a new post in a long time. so here is an addition to the site, user djamps developed an open source tuning tool, you upload the log file filter some key data and perfect your maf table.
by Chris
DIY pulley tensioner for $30 / $60 for dual.
Gates PowerGrip – Timing Belt Pulley Part # T42005
Link to oreilly auto
Also needed is a bolt 1.5″ long with M10x1.25 thread pitch
by Chris
Hypothetically speaking, let’s say you had the wrenching skills necessary to build a 600hp Rat motor for $6,500. With the astounding airflow potential of today’s conventional, 24-degree, big-block Chevy cylinder heads and the multitude of dirt-cheap rotating assemblies cluttering up the Summit catalog, this caliber of horsepower-per-dollar heroism is certainly attainable-try hard and you could even do it with stock rec-port heads. Even though that would qualify as an impressive budget build by most standards, how many people have an extra $6,500 to throw around on anything, let alone an engine, these days? Since we’ve all had to recalibrate our affordability scale in recent years, it’s only prudent to pursue truly budget-friendly engine combos that most hot rodders can build without running up the credit cards.
While that concept is, like, so cliché, we’re serious about turning up the wick on dollar-stretching performance. How does a junkyard 5.3L Gen III small-block, boosted to 550 hp with a do-it-yourself turbo setup, built for $3,069, suit your fancy? That tally includes a tuned factory computer, a wiring harness, bigger fuel injectors, and every last nut, bolt, and U-bend to make it happen. If you’ve got another $183 to spend on a stock LS6 camshaft, the power jumps to 594 and the price tag to $3,252. We built it and you can, too, so let’s fire up the welder and throw some sparks.
The Dirtball Special
Throwing boost at a 5.3L Gen III small-block just makes too much sense. Secondhand OE hardware stockpiled in junkyards has always represented the pinnacle of cheap performance, and the LS-series small-block takes this universal truth to the extreme. Unlike in the early days of LS engine swaps, where hot rodders paid a big premium just for the cool factor, these motors are now just as cost effective to build as a Gen I small-block Chevy. Aluminum variants still command a premium-with plain-Jane, 5.7L, LS1 long-blocks costing upwards of $2,000-but their iron counterparts are much more plentiful and sell for a fraction of the cost. The hot ticket in the Vortec truck engine lineup is the 6.0L LQ9, which was originally installed in 3/4-ton trucks and SUVs. It packs an additional 18 ci over the 5.7L (364 versus 346) and comes equipped with aluminum, LS6-style cylinder heads. The LQ9’s 4.000-inch bores mean that it’s compatible with GM’s L92/LS3 rectangle-port head castings that flow a stunning 320 cfm out of the box. Matching them with a mild hydraulic roller cam nets an easy 550 hp for about $5,000, even after factoring in the cost of a single-plane intake manifold, a carb, an MSD ignition controller, and headers.
If the 6.0L is so great, then the obvious question is, why even bother building a 5.3L in the first place? The biggest downside to the 6.0L truck motor is scarcity, and some early ones had piston-slap issues. GM built way more 1/2-ton trucks and SUVs with 5.3L engines than it did 3/4-ton models with the 6.0L. Consequently, junkyard 5.3L motors can be had for $250, while their bigger brother fetches $1,000 to $1,500. For a naturally aspirated engine build, the 6.0L is a more appealing option due to its additional displacement and superior cylinder heads. On the other hand, what if you took the money saved by buying a 5.3L motor and put it toward a DIY turbo system? To make things more interesting and further drive down costs, let’s hang one of those Chinese eBay turbos off of the factory exhaust manifolds and see if it holds.
On paper, a stock 5.3L small-block boosted to 7 to 14 psi seems to have the edge over a naturally aspirated 6.0L build in terms of horsepower per dollar. To put this bold theory to the test, we purchased a complete 5.3L LM7 engine plucked out of an ’01 GMC Yukon-complete with a matching computer and wiring harness-for $449 from a Houston junkyard. If you can’t find a 5.3L motor locally, there are tons of similar deals on eBay if you’re willing to dish out a couple hundred dollars for shipping. At this price point, expect a motor with lots of miles; our tester had 150,000 on the ticker. Even so, many of the junkyards we ran across offered some type of guarantee that their engines were in good working condition.
To pressurize our test subject, we put in a lowball bid on eBay for a 76mm turbo and won it for $425. The rest of our cobbled-up DIY turbo system included a Turbosmart wastegate, blow-off valve, and manual boost controller. To control the fuel and spark, we matched up a stock computer with HPTuners tuning software, Ford SVO 42 lb/hr fuel injectors, and a GM 2.5-bar MAP sensor off of a new Chevy Cobalt SS. The U-bends, flanges, and V-band clamps required to build the turbo piping were all supplied by Fastlane Inc. in Houston, which also stepped up to fabricate everything for us. Fastlane specializes in building custom turbo systems for LS-, Hemi-, and mod-motor-powered late-models, and was kind enough to rig us up a kit in no time. (As you’ll notice, the labor to fabricate the plumbing from the tubing we provided was not included in the total price. Anyone with a MIG welder should be able to build this setup, but if not, factor in several hundred dollars for the fab work.) From there, we hauled the motor down the street to the good folks at the School of Automotive Machinists for a merciless dyno thrash.
Boost
With the 5.3 strapped to SAM’s SuperFlow 902 engine dyno, our goal was to see how far we could push the stock long-block on 93-octane pump gas. For the baseline pulls, we set the wastegate at 8 psi of boost and dialed in a conservative 11.8:1 air/fuel ratio and 16 degrees of ignition timing. The wee 325ci mill responded with a respectable 532 hp at 5,300 rpm and 562 lb-ft of torque at 4,500 rpm. For the next round of testing, we increased the boost to 12 psi, and surprisingly, the motor lost between 10 and 15 hp from pull to pull with the power curve jumping up and down above 5,000 rpm.
Suspecting that the stock 150,000-mile valvesprings were the culprits, we swapped them out for a set of LS6 units. The simple fix did the trick, and horsepower and torque increased to 550 and 575, respectively. “On an engine with that many miles, it’s possible that the boost pressure was preventing the worn out valvesprings from closing the valves all the way,” explained Judson Massingill of SAM. With a junkyard build like this, it’s probably a good idea to replace the valvesprings no matter what.”
Considering that the stock 5.3L motor is choked by a minuscule 191/190-at-0.050 cam with just 0.457/0.466-inch lift, the 550 hp our test mule produced thus far was even more impressive. Curious to see what dividends some extra duration and lift would yield, we installed a stock GM LS6 camshaft. The cam was PN 12560950, the ’01 LS unit. There’s much confusion online over the LS6 cam specs, so we had SAM get the real numbers on a Cam Doctor: 203.8/212.1 duration at 0.050, 0.523/0.522 lift, and a 115.9-degree LSA. The LS6 cam’s wide lobe-separation angle bolsters its boost-friendly credentials. Even so, we were shocked when output jumped to 594 hp and 588 lb-ft from a measly 13-degree increase in intake duration. Conventional wisdom says that stock camshafts work well in forced-induction applications, but when the cam in question is as small as the stock 5.3L LM7’s, conventional wisdom apparently doesn’t apply.
Breaking Down the Numbers
In retrospect, our DIY turbo 5.3L motor built on a working-man’s budget far exceeded every expectation. As much as we’d like to take credit for it, LS enthusiasts have been building similar budget turbo combos long before we took a crack at it. To our surprise, the factory long-block survived 27 dyno pulls without a hitch, the Chinese turbo didn’t self-destruct, and it came within six numbers of cracking the 600hp mark. Even at 594 hp, the Dirtball Special produced more than twice the output of a stock 285hp 5.3L LM7. That said, there’s definitely more left in this package considering that the motor picked up just 18 hp after cranking up the boost from 8 to 12 psi. To keep costs to a bare minimum, we passed on rigging up an intercooler, but our dyno figures clearly indicate that this decision sacrificed power during our high-boost pulls. “With an intercooler or methanol injection, this engine would easily make 650 hp,” SAM Head Instructor Chris Bennett opined.
Big-time power gains aside, the pressing question for anyone contemplating a similar buildup is how long a turbocharged, stock, 5.3L engine will last. Based on our dyno results, it’s a good idea to limit boost to 7 to 8 psi on pump gas in nonintercooled applications. Without a means of cooling the inlet air temperature, anything beyond that point yields negligible power gains while increasing the potential for detonation. Furthermore, infinite variations in fuel quality and a hot rodder’s engine tuning skills make it very difficult to put an exact figure on short-block longevity. A whole lot of stupidity can blow up a motor in not a lot of time, whereas some enthusiasts have reported tens of thousands of miles of reliable operation from their forced-induction LS motors. The great thing about the 5.3L small-block is that if you do indeed blow it up, a mere $250 will get you back on the road to boosted glory once again.
At the outset of this engine build, we wanted to find out if a junkyard 5.3L Gen III motor with a giant DIY turbo hanging off the stock exhaust manifolds could really make more power than a naturally aspirated 6.0L for less money. With the fab work and dyno testing complete, the answer is a resounding “yes.”
People’s Republic of Boost?
Although we managed to make some respectable horsepower numbers with a Chinese-made knockoff turbo, we can neither advocate them nor advise against them. On one hand, our unit performed very well during our test. Conversely, the experts at Fastlane have seen them go kaput with minimal mileage. That said, we can’t in good conscience recommend bolting one into a car with expectations that it will last tens of thousands of miles. It just so happens that HOT ROD is in the position to serve as a universal lab rat so you won’t have to spend your hard-earned money experimenting with a Chinese turbo on your own. Just like the reliability of offshore cranks and rods was questionable at best in the beginning, but improved substantially in the years that followed, it’s possible that Chinese turbos will follow a similar path. Even so, turbos are much more complex devices to reverse-engineer than cranks and rods, and for now, the higher cost of well-established, American, name-brand turbos is well worth it. We’d like to pit our Chinese T76 against a Borg Warner T72 to see who comes out on top.
| BUDGET BREAKDOWN | ||
| ITEM | PN | COST |
| Junkyard 5.3L motor, PCM, wiring harness | $449 | |
| Ebay 76mm turbo | N/A | $425 |
| T4 turbo flange | 14410 | $26 |
| 1.75-inch U-bend | N/A | $25 |
| 2.5-inch U-bend | N/A | $27 |
| 3-inch U-bend | N/A | $37 |
| 2.5-inch flex joint | 4556 | $27 |
| 3-inch flex joint | 46544 | $32 |
| Silicone coupler | 2744B | $59 |
| Silicone reducer | 2760B | $15 |
| 2.5-inch V-band clamp and weld end | N/A | $26 |
| 3-inch V-band clamp and weld end | N/A | $38 |
| T4 oil drain flange | 2849 | $15 |
| -10AN oil line (3 feet) | 230003 | $21 |
| -8AN oil line(3 feet) | 230803 | $16 |
| 1/8-to-4AN adapter fitting | 10292 | $4 |
| 3/8-to-10AN adapter fitting | 10294 | $5 |
| O2 sensor bung | 1194A | $5 |
| Turbosmart wastegate | 0504-1001 | $399 |
| Turbosmart blow-off valve | 0204-1001 | $299 |
| Turbosmart boost controller | 0106-1001 | $137 |
| Ford SVO 42 lb/hr injectors | M-9593-F302 | $309 |
| GM 2.5 bar MAP sensor | 12614973 | $53 |
| GM LS6 valvesprings | 12499224 | $57 |
| HPTuners software | N/A | $499 |
| GM ’01 LS6 camshaft | 12560950 | $183 |
| NGK TR6 spark plugs (8) | 4177 | $16 |
| Royal Purple 10W-40 oil (6 quarts) | 01140 | $48 |
| TOTAL: | $3,252 | |
| DYNO RESULTS | ||||||
| 5.3L at 8 psi | 5.3L at 12 psi | 5.3L w/LS6 cam at 12 psi | ||||
| RPM | HP | TQ | HP | TQ | HP | TQ |
| 4,100 | 433 | 555 | 444 | 569 | 457 | 585 |
| 4,200 | 446 | 558 | 458 | 572 | 468 | 585 |
| 4,300 | 459 | 560 | 470 | 574 | 480 | 587 |
| 4,400 | 470 | 561 | 481 | 575 | 492 | 587 |
| 4,500 | 481 | 562 | 492 | 574 | 502 | 585 |
| 4,600 | 492 | 561 | 502 | 573 | 511 | 584 |
| 4,700 | 502 | 561 | 512 | 572 | 522 | 584 |
| 4,800 | 511 | 559 | 521 | 570 | 535 | 585 |
| 4,900 | 518 | 555 | 528 | 566 | 548 | 587 |
| 5,000 | 524 | 550 | 536 | 563 | 560 | 588 |
| 5,100 | 528 | 544 | 543 | 560 | 569 | 586 |
| 5,200 | 530 | 536 | 548 | 554 | 575 | 581 |
| 5,300 | 532 | 527 | 550 | 545 | 580 | 575 |
| 5,400 | 531 | 516 | 550 | 535 | 585 | 569 |
| 5,500 | 528 | 504 | 547 | 522 | 589 | 563 |
| 5,600 | 524 | 491 | 542 | 508 | 594 | 557 |
| SOURCE | |
| Scoggin-Dickey Parts Center 5901 Spur 327 Lubbock TX 79424 800-456-0211 http://www.sdparts.com |
Fastlane Inc. 10541 FM 1960 Rd W #600 Houston TX 77070 713-600-8600 www.fastlaneturbo.com |
| Turbosmart 11650 Mission Park Drive Suite 103 Rancho Cucamonga CA 91730 909-476-2570 www.turbosmartonline.com |
School of Automotive Machinists 1911 Antoine Houston TX 77055 713-683-3817 http://www.samracing.com |
Read more: http://www.hotrod.com/techarticles/engine/hrdp_1104_594hp_53l_gen_iii_small_block_for_3252/#ixzz3EXI3EFoQ
Follow us: @HotRodMagazine on Twitter | HotRodMag on Facebook
by Chris
this example tune is provided by 350z user djamps from the diy Uprev Tuning thread
THESE TABLES ARE FOR A VERY SPECIFIC F/I SETUP! I’m running GT25 twins with 600CC DW’s, AAM basic fuel return, and HPX MAF. Don’t be stupid and start making power pulls with these tables on YOUR setup. Tune it right and use these values as starting points if you want.
This tune actually took me almost a year to perfect a little here, a little there, learn from mistake and start over and repeat, ect ect. Some so-called ‘tuning shops’ and even exhaust parts and turbo kit manufacturers could learn alot from this post.
As of now it’s running perfect in every way from startup, mid throttle, and WOT. A/F in close and open loop are right on target. As you can see, most of the fuel work was done on the MAF table. Basically the car drives exactly like stock in and out of boost, with zero misfire.
If you’re not running a fuel return system, you’re going to be rich at low loads, and lean out hard in higher loads with this map so be aware! If you are running a return setup, set your base pressure to 48psi (or adjust the K accordingly to your pressure).
FYI I made 400whp with this tune at 8.3psi and power all the way to 7krpm in 108 degree ambient temps and major heatsoak. And I’m also running cats, so there’s probably more power to be had.
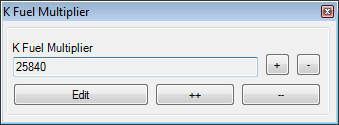
K fuel adjusted for my base pressure and injectors:
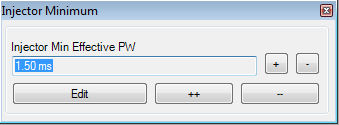
Injector minimum for DW 600 IMPORTANT that you upgrade to the latest ROM editor, as the older versions apply the wrong values:
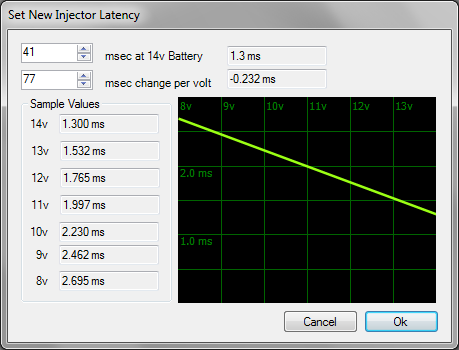
Latency for DW 600 – IMPORTANT that you upgrade to the latest ROM editor, as the older versions apply the wrong values:
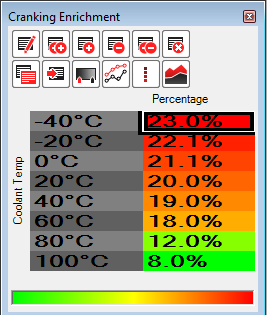
Startup enrichment – you need to pull ALOT from here especially at the bottom:
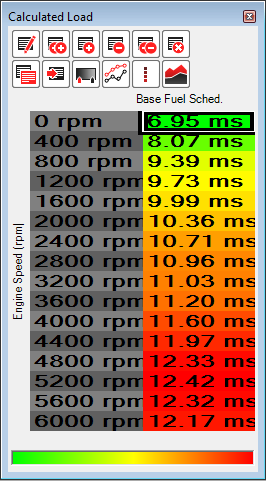
Load table (needed for 5AT only — I did it anyways so my logs looked better). Once you dial in your max fuel schedule on the fuel tables, adjust this so you’re hitting 100% whenever you’re in boost. If you don’t do this correctly, the torque converter will not lock up and it will granny shift to an early demise:
MAF table for my HPX MAF — IMPORTANT – If you don’t have a fuel return system, these MAF values will NOT be a good base map for you to start with, in fact it will make life more difficult!!! start with the Uprev tuned HPX MAF table instead. This table is where I spent most of my time. Yours will flatten out at a different lower voltage since they suck bawls at idle. It’s a delicate balance of fuel compensation and flattening to keep the A/F from bouncing at idle. At first, I tweaked the idle and free revving voltages manually by going over logs and making manual adjustments. Once it was somewhat drivable (out of boost), I took some logs of driving around normally and started making adjustments with my maf tool. Eventually I did a super rich boost pull and made more manual adjustments in the boost voltages. Once I was in the ballpark, I again used the maf tool to get the A/F exactly where I wanted it at all boost levels.

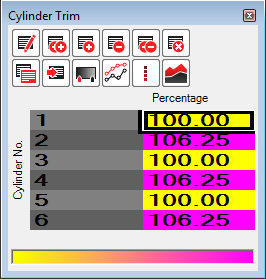
Cylinder trim — I’m glad uprev included this, because I was running about 0.6 a/f leaner on bank 2 in boost which required 6% increase in fuel for bank 2 to iron out — you should probably skip this at first and see how far your banks are off in boost before adjusting.
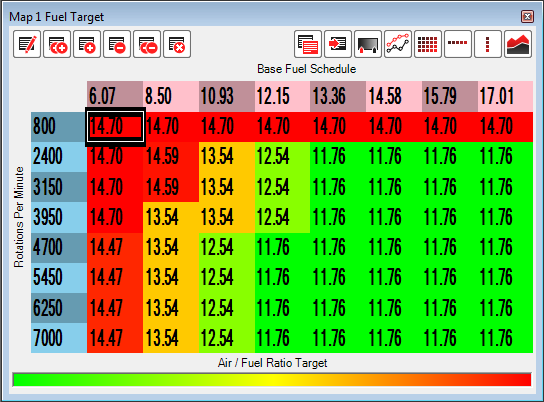
Fuel target — this has been adjusted with F/I and stock block in mind. take CAREFUL notice of the fuel schedule on the horizontal axis! You need to change the maximum value on the axis, then use the linear interpolation button on the whole row to smooth it out. This has to be done to timing table too! This DOES NOT happen automatically! If you changed your redline, do the SAME THING to the RPM column! The actual max fuel schedule totally depends on your fuel system. Yours will be higher without a fuel return, or with smaller injectors. On your first WOT pull, see how far the cursor goes to the right and adjust until it gets at least 80% accross the table.
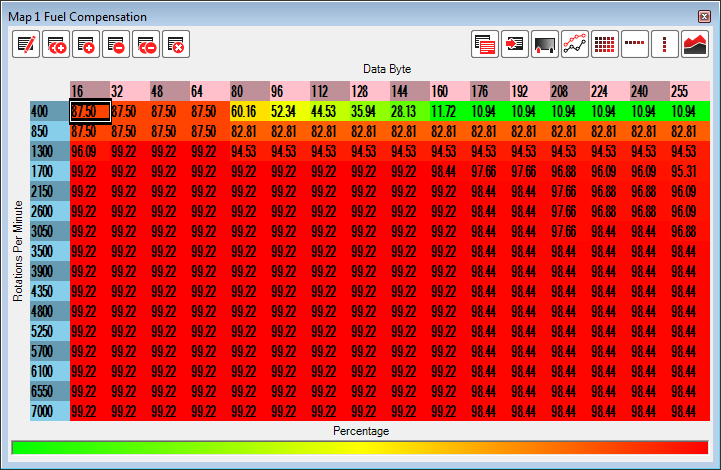
Fuel comp – I made most of my adjustments to the MAF table (manually to get in ballpark, then finished off using my tool http://djlab.com/uprev/maf.php) so the fuel table is mostly flat except for idle and cranking trims:
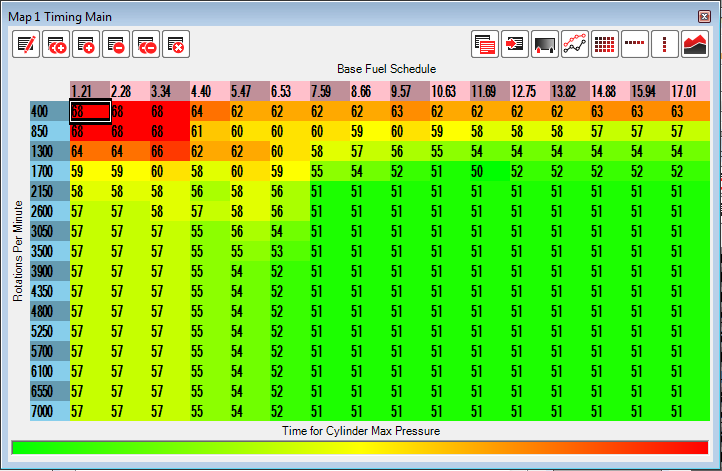
Timing main – Be sure to adjust the fuel schedle accordingly just like the fuel target table. Also, don’t run this high of timing unless you have knock headphones and know what to listen for. This map starts around 13deg at 3krpm and reaches 17deg at redline at 9psi (you should start with less!). Notice how it is smoothed out in the low-load areas so there isn’t a big jumps in timing in any direction. The key is no big jumps in values, because the ECU doesn’t like that and you will end up with instability. IMPORTANT If you run too low of timing in low load (left half) you can end up with a ‘danger to manifold’ situation as EGT’s will go thru the roof!:
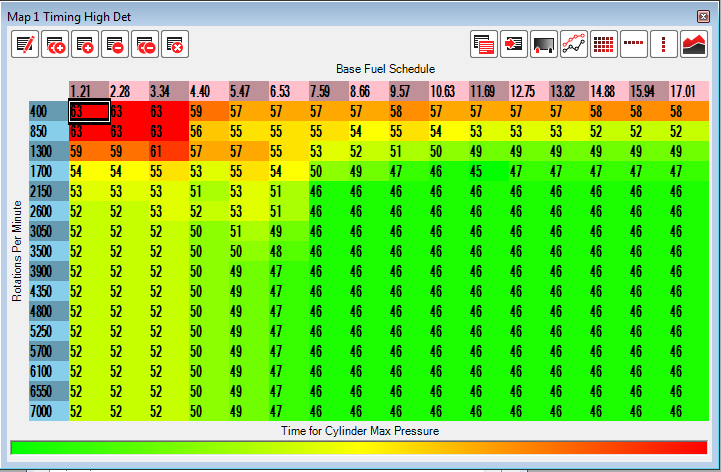
Timing hi-det – copy and paste the main timing and subtract 4-5 from everything:
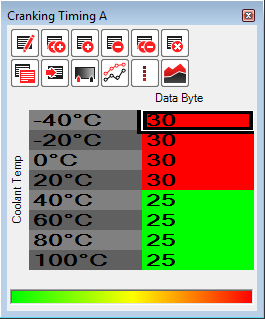
Cranking timing (A Table): Adding some timing at higher temps on the A table seems to help with warm starts.
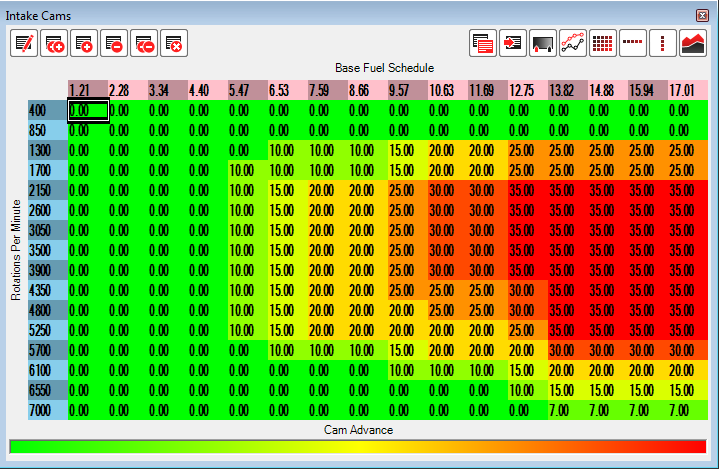
Intake cams – RPM’s are scaled and cam advance is mostly stock, except extended for the new redline:
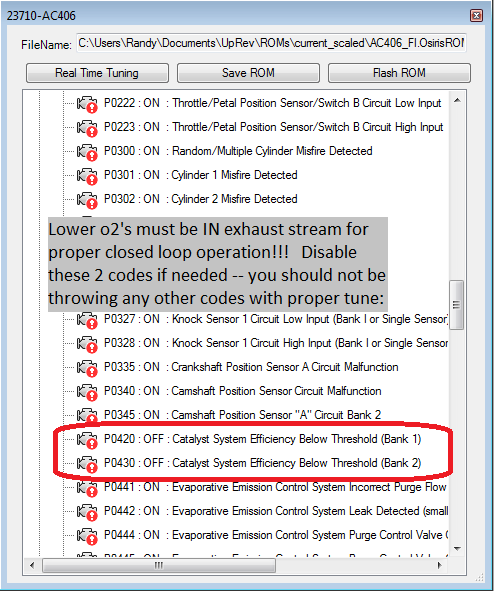
DTC disable – You should ONLY have to disable the two catalyst codes. If you throw any other codes, you’ve got a problem with the car or your tune. Misfire codes or codes of any other type should NOT occur with proper tuning and all sensors in place. In my year of struggling with this ***** of an ECU, I learned through trial and error the lower o2’s play a big role in closed loop operation. If you have them removed from the exhaust stream with non-foulers, steel wool, or simply tied up (like on the momentum kit) you’ll have issues dialing in your closed loop trims and may even throw bank range/lean/rich codes with an unstable A/F over time:
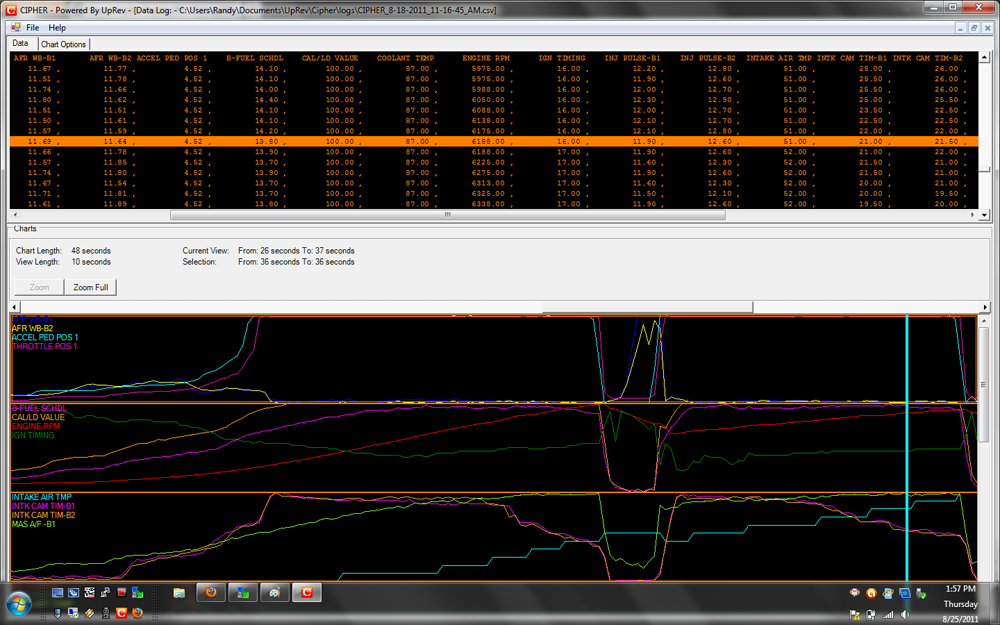
And finally, a 2nd and 3rd gear pull:
this post taken from:
Uprev diy Tuning 101
by Chris
did your ( 350z / g35 / altima / titan / insert other nissan here ) window motor stop working? the common solution on the forums / facebook groups is to throw away the old one and buy a new one for around $150.
you can take the motor apart and clean it and it will start working like new again!
it seems from the factory the window motors were over greased, when the window moves in one direction it flings grease up into the electric motor gumming it up and causing it fail. here is a picture of mine after removing it.
i used rubbing alcohol, paper towel, q-tips, a razor blade and some sand paper to clean up the electrical contacts, here is the after
it has been working for 5 months now without issue! best part is saving $150
there are some youtube videos out there that also show the cleaning with some more detail. (not my video)
video link to fix window motor
by Chris
i started out trying to sand the bracket, it was taking a really long time and i was burning up a lot of sand paper. i thought there must be a better way, it turned out there was. i read somewhere on the line that common degreaser would chemically un-bond the anodizing from the aluminum so i figured i would give it a shot.
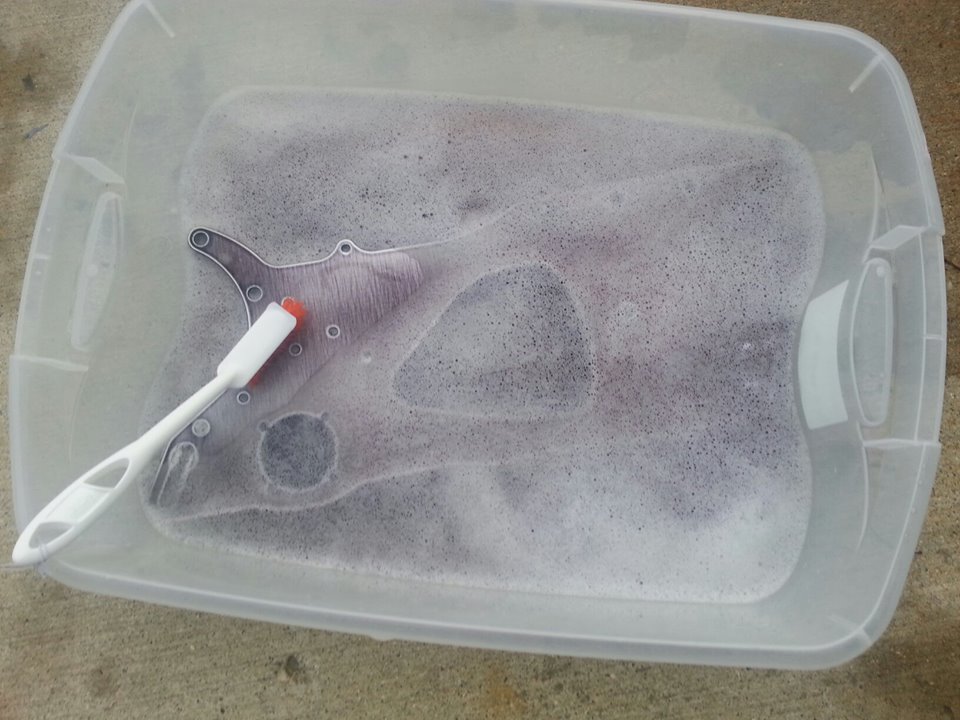 into the bath! a brush helps to remove the anodizing so the de-greaser can work on the fresh stuff underneath.
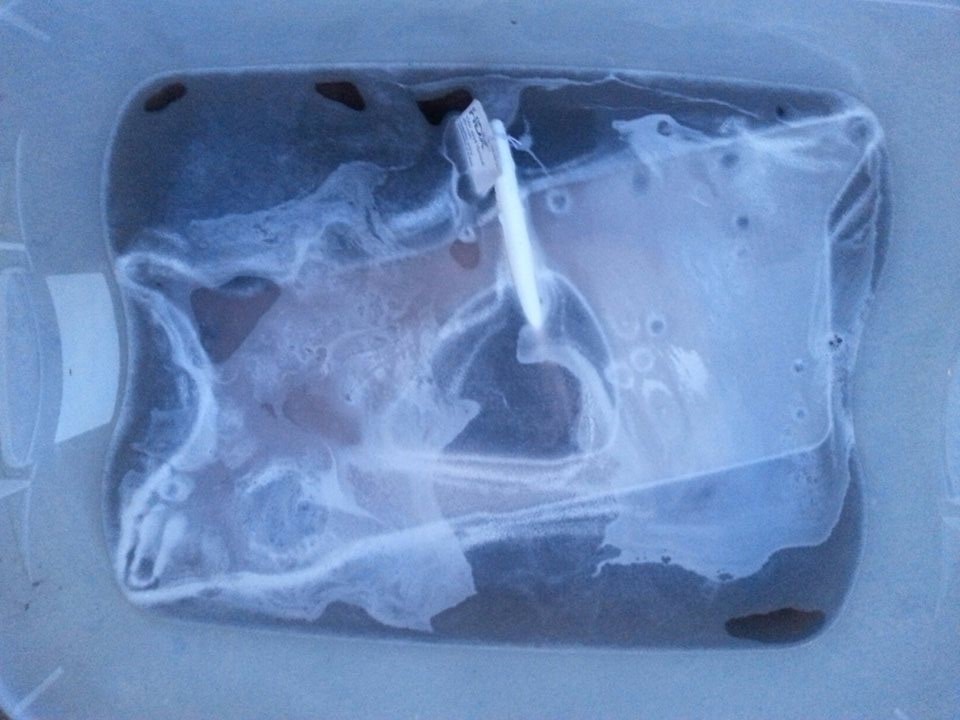 keep a close eye on your part and make sure to not over do it, about every 15-20 min i was checking the part and using the brush to scrub the anodizing off.
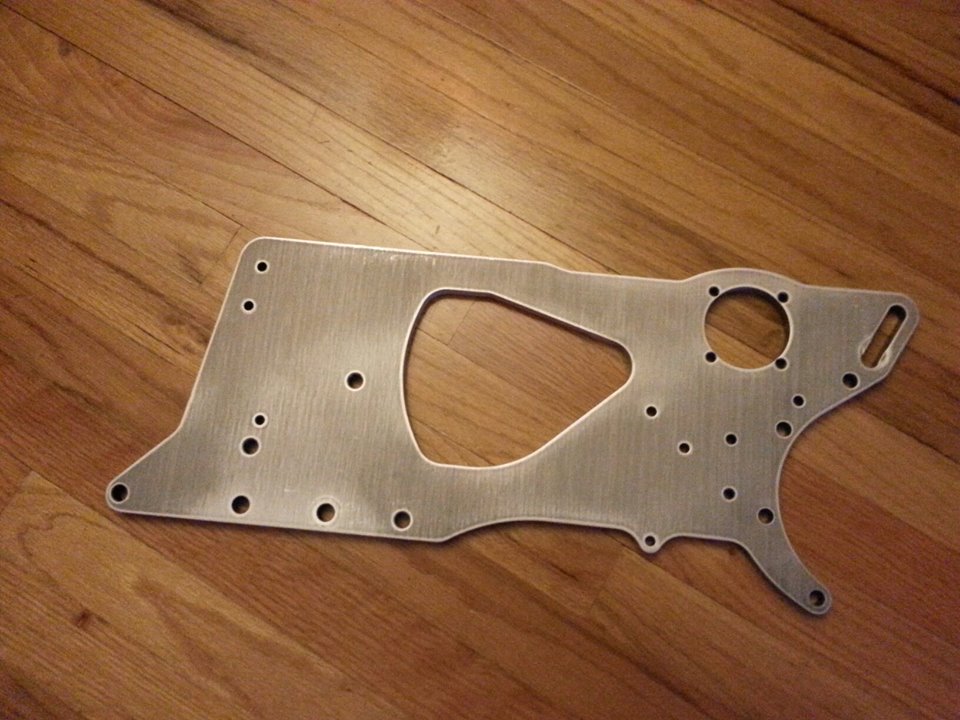
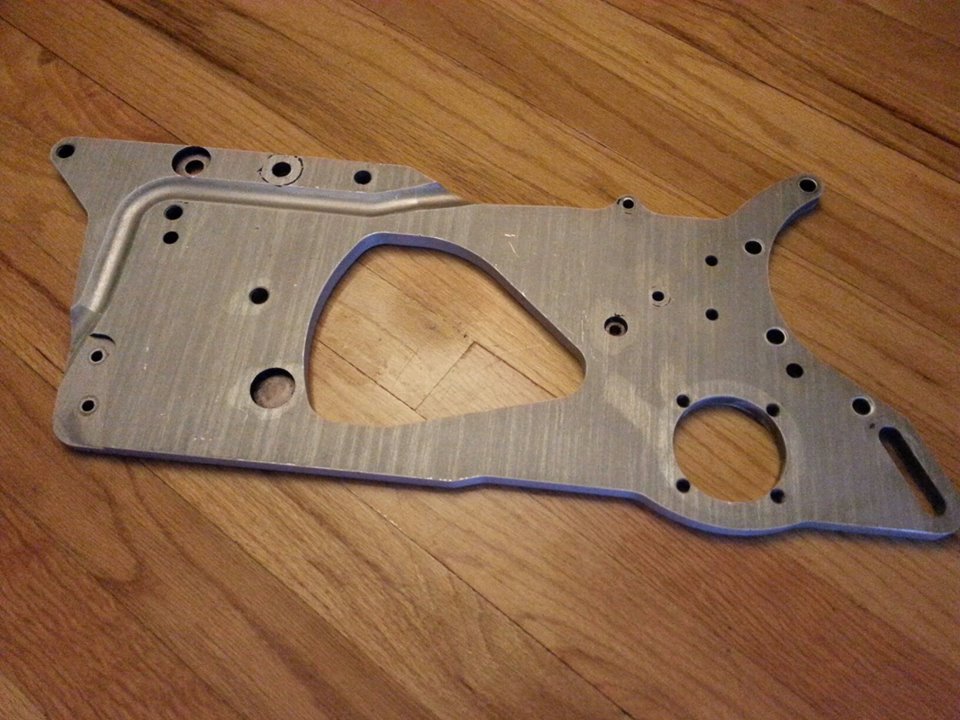 my results after about 60 min of soaking
next step is to resume sanding from 200 – 400 – 800 – 1000 – 2000 grit then polish.
stay tuned!
by Chris
added a Nissan tuning guide from an uprev PDF to the Automotive page